


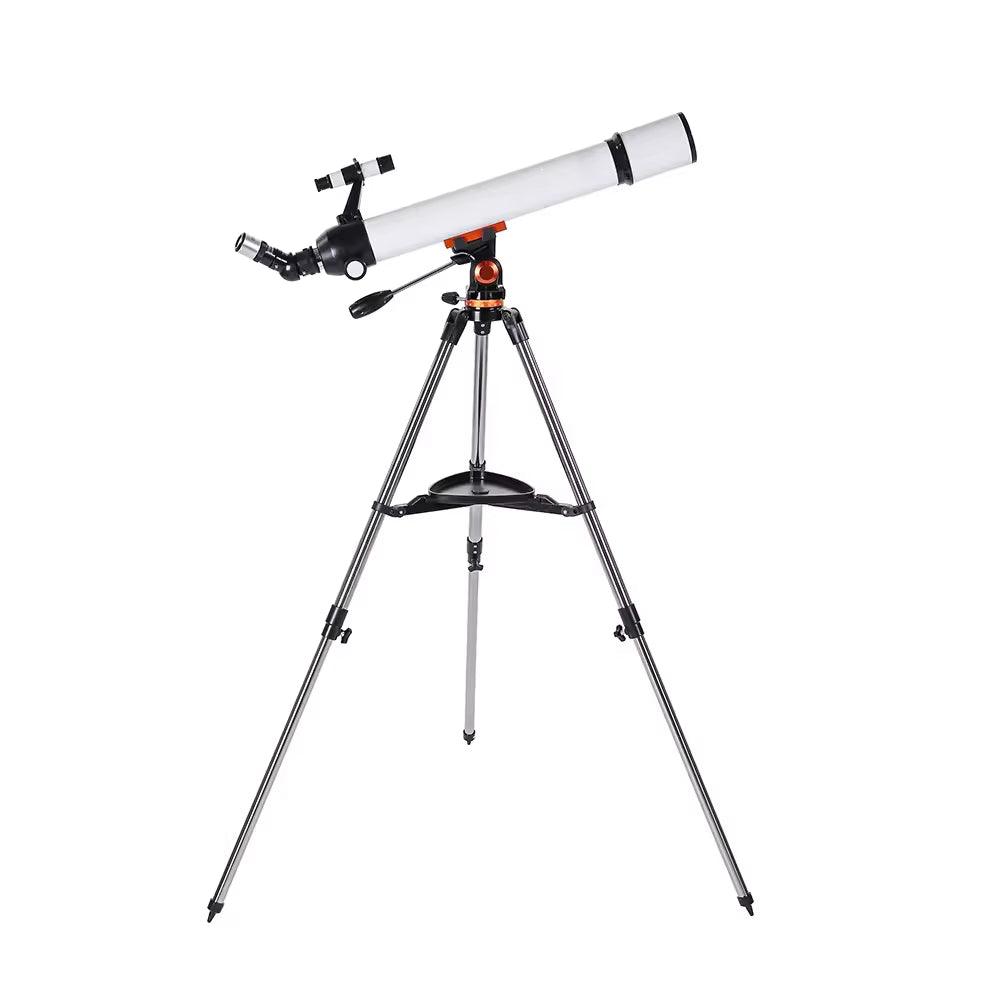
EYEBRE 70070 Astronomical Telescopic
Rs. 13,999.00
Skip to product information


EYEBRE 70070 Astronomical Telescopic
Rs. 13,999.00
Taxes included.
Shipping calculated at checkout.
Size chart

100% Secure Transaction
Fast Delivery
Exchange Available

Free delivery
within 4–5 days

4-Day Free Exchange — No Questions Asked

Made in India
with love
-
BUY 2 GET 5% EXTRA
BUY 2 GET 5% EXTRA5% off Adventure & Tactical Clothing and Shoes | The Adventure Hut
-
Free Shipping
FREE SHIPFree shipping on orders over ₹499
-
EXCLUSIVE FOR YOU
EXCLUSIVE FOR YOU 5%EXTRA OFF : TACTICAL ADVENTURE GEARS AND EQUIPMENT ABOVE 2499
-
NO - CODE MYSTERY DISCOUNT
NO CODE REQUIREDAUTOMATIC MYSTERY DISCOUNT AT CHECK OUT. ( NO CODE REQUIRED )
Estimated Delivery
Order within --h --m for discounted price
Delivery: --/--/-- - --/--/--
Ordered
--/--/--
Shipped
--/--/--
Delivered
--/--/--
Made-to-order products may require extra processing time before dispatch. Applicable only for deliveries in Tier 1 Metro Cities.
It is recommended that you keep the packaging box of your telescope to protect it when not use or when transporting it. Unpack carefully to prevent the loss of small parts. Check the package contents according to the parts list described below.
Parts List
1. Mirror slip
2. Red dot finder scopе
3. Eyepiece
4.Zenith mirror
5. Focus knob
6. Focusing scale
7. Control handle/elevation angle clutch
knob
8. Tripod
9. Accessory tray fixing button
10. Foldable accessory tray
11. Objective lens cover
12. Dove tail board
13. Theodolite
Use a telescope
The 70070 telescope's theodolite is easy to use. To turn the telescope left or right, loosen the locking screw on the theodolite base (located between the two legs) and grasp the
control handle to turn the telescope to the desired position. By adjusting the tightness of the locking screw, the damping feeling of left and right rotation can be adjusted.
Grasp the control handle and turn it counterclockwise to release the altitude clutch of the theodolite, thereby controlling the up and down rotation of the telescope. Move the control handle up or down to turn the telescope to the desired angle, then turn the handle clockwise to secure the telescope.
Calibrating the finderscope
The finderscope is used to assist the telescope in locating targets through the reticle on its
window. After assembling the telescope for the first time, it needs to be calibrated. While
calibration can be done at night, it is often easier to perform during the day. Once calibrated,
the finderscope typically does not require recalibration unless it has been removed or
subjected to a shock.
1. Choose an easily visible target, such as a large tree or a roof, with the naked eye. The target should be at least 500 meters away.
2. Remove the front cover of the telescope and install the zenith mirror and 25mm eyepiece.
3. Adjust the telescope vertically, horizontally, left, and right to point it toward the selected
target.
4. Look through the eyepiece and adjust the telescope until the target selected in the first step is centered in the field of view.
5. Once the target is centered, turn on the power to the finderscope and adjust the brightness to the maximum level.
6.Look into the circular window approximately 30 cm behind the finderscope to locate the
reticle. The reticle should not be too far from the target in the eyepiece's field of view.
7. Without moving the telescope, use the adjustment knobs on the side and bottom of the
finderscope. One knob controls left and right movement, while the other controls up and
down movement. Adjust the knobs until the reticle precisely overlays the target observed
through the eyepiece.
Now, you can attempt to locate other distant targets to practice using the finderscope. Align the red dividing line with the target observed by looking through the rear of the finderscopе,and then observe through the eyepiece. Once the finderscope is aligned, the telescope is fully assembled, and you are ready to begin observing.
Note: Remember to turn off the power of the finderscope when it is not in use to conserve
battery power
Moon
Now your telescope is ready for a night out, and you can engage in some real observing.
The first celestial object to observe is the moon. The moon undergoes a phase cycle
approximately once a month, transitioning from new moon to full moon to waning moon.
You can attempt observations during different phases. The moon is observable on any night when it is visible, with the best viewing period being between two days after the new moon and a few days before the full moon. During this time, you can observe various details on the moon's surface, such as craters, maria, and radial patterns. Please refer to a lunar calendar for specific moon phase times.
1.On a clear, moonlit night, assemble the telescope, insert the 25mm eyepiece, and secure it.
2.Activate the red dot finder switch and locate the red dot.
3.Adjust the telescope until the red dot aligns with the center of the moon through the
finderscope.
4.Look through the 25mm eyepiece and carefully adjust the focus knob until the image is
sharp and clear. Congratulations! You have completed the observation of your first celestial object!
Photography Tips and Tricks
Camera Control:
Standard smartphone camera apps offer only very basic controls, primarily autofocus and
autoexposure. While sufficient for everyday photography, issues may arise when capturing
very bright targets against a dark background, such as planets and the moon. Mobile phone cameras tend to increase brightness in dark areas, causing overexposure in bright regions and loss of detail. If your camera app lacks manual focus point selection or the option to disable autofocus and autoexposure, consider using a different camera app. There are many powerful camera apps available on the iOS App Store or Google Play Store, with many being free.
Vibration:
To eliminate any vibration caused by touching the screen while capturing images, utilize
the time-lapse feature available in some apps. These apps may offer a 2-, 5-, or 10-second
time-lapse feature, which minimizes vibration before taking the picture.
Shooting Targets:
Using the aforementioned method, you can photograph ground targets during the day and celestial bodies like the moon and large planets (Venus, Mars, Jupiter, and Saturn) at night. However, due to smartphone camera sensors not being optimized for low-light targets, they struggle to capture darker objects such as galaxies and nebulae effectively.
Magnification:
When observing the moon and planets with a fixed telescope, you'll notice objects moving
in the field of view due to Earth's rotation. For instance, with a 20mm eyepiece, a planet
may traverse the entire field of view in about 3 minutes, while with a 10mm eyepiece, it's
approximately 1.5 minutes. Smartphones utilize only the central part of the eyepiece's field
of view, making the movement appear faster. To track celestial targets effectively, try placing the target at the edge of the field of view initially, allowing it to enter gradually for extended observation. Begin with a 25mm eyepiece for easier tracking before progressing to a 10mm eyepiece.
Key Feature:
Type: Astronomical Telescope
Brand: Eyebre
Magnification: 459X
Objective diameter: 70mm
Customized support: Oem, Odm, Obm
Weight: 3kgs
Type: Zoom Lens
Shipping
- We will work quickly to ship your order as soon as possible. Once your order has shipped, you will receive an email with further information. Delivery times vary depending on your location.
- We ship Certain Products Thru INDIA POST.
- Express Shipping is Done With Ship-rocket.
- We Work With Multiple Shipping Aggregators to Provide Better Shipping Experience.
Return & Exchange
- Our goal is for every customer to be totally satisfied with their purchase. If this isn't the case, let us know and we'll do our best to work with you to make it right.
- There is a 4 Days Exchange and Return Policy Sitewide, Except Products on Sale.
- We charge a Small Restocking Fee On Exchange & Return.
- We Have a Different Exchange & Return Policy For Army, Ncc and Custom Made Goods.
- For Detailed View of Our Policy page Click Here
Manufacturing
- Our products are manufactured both locally and globally. We carefully select our manufacturing partners to ensure our products are high quality and a fair value.
- Wildcraft Products Cover 5 Year Manufacturer Warranty, It can be claimed at Store or Online thru Manufacturer.
SIMILAR PRODUCTS
Trending Now
Hot Selling Articles
Gear up with our most popular tactical essentials


category